|
Corrosion,
Jacking
Points, S1 Side Cooling Intakes, Manifold, Engine release cable replacement, Bonnet release Emergency instructions, Inertia Switch, Recalls. Soft Top Fitting, Cobra reset
Miscellaneous
This section is for the info that doesn't readily fall into the other
categories
For
infomation about footwell corrosion, see here
Commonly used parts list (with numbers), click here
For cleaning tips, click here
For winter storage tips, click here
For details of recalls, see here
Inertia Switch details here
Roof removal & fitting instructions here
Jacking Points
You need to be carefull how you jack the Elise up.
a) in case you damage the underside
b) in case it falls of whatever you're using to jack it.
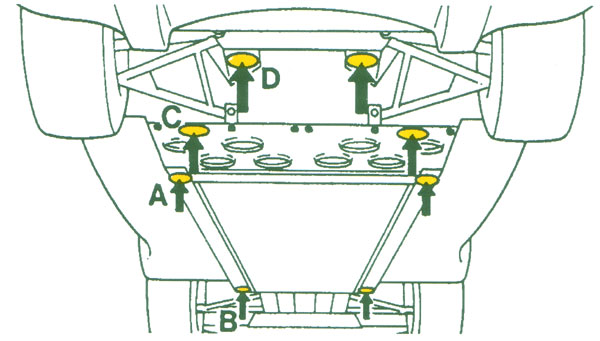
The diagram above shows the recommended jacking points, viewed from
the rear o the car with the rear and intermediate undertrays
removed.
A marks the single point per side jacking point,
marked with a blue jacking point sticker on the underside of the car.
This jacking point will allow you to raise both wheels on one side of
the car at the same time.
B marks a jacking point that should be used when the
car is raised on a 4 point lift, in conjunction with the
C point (below)
C marks a jacking point, in the fuel tank bay shear
panel, whcih should be used in conjunction with point B
(above) when raising the car on a 4 point lift. This jacking
point cannot be used without removing the undertray.
D marks a jacking point that may be user to raise
the rear of the car. This jacking point cannot be used without
removing the undertray.
Jacks
Many trolley jacks are too high to fit under even a stardard Elise,
there are two solutions to this, the first is to source a trolley jack
that does fit, the second is tou get some short planks of wood and to
drive the car onto these planks, raising that side of the car, then
using a higher trolley jack.
You should be very carefull that the jack is adequately secured
underneath the car, and that the car car cannot slip off the jack, the
side chassis members are slippery as they are smooth aluminium.
Use a piece of wood or a rubber mat between the jack and the car to
prevent this, and to prevent the head of the jack from damaging the
finish on the underside panels.
S1 Side Cooling Intakes - Do They Work ?
There's been much debate, discussion, conjecture and bs published
relating to the function of the side cooling vents on the S1 Elise. Some
people saying that they do not actually work at all.
I did a very unscientific test using very basic tools to determine
whether there is a pressure gradient between the outer vent cover and
the engine bay - the results are here.
Manifold
Instructions for fitting a Janspeed manifold can be found at http://www.elisenet.plus.com/Manifold.htm
Engine release cable replacement
Instructions for replacing the engine cover release cable can be found at http://www.elisenet.plus.com/Cable.htm
Bonnet release Emergency instructions
Remove a wheel and wheel arch liner, then with a broom handle you can press the release mechanism. IIRC it's the left hand side that you need to remove as the mech needs pushing towards the right (but don't blame me if it's the other way around). The alternative is to poke a piece of bent metal under the bonnet via the gap where the wiper arm emerges, you should be able to just reach the catch. Push it towards the driver's side. It's a bit of fiddle and it's easy to chip the paint. Alternative: Thread a cable tie around the pin as best you can, then get something to pull the cable tie, then wiggle and pull in the to pop it open (hopefully).
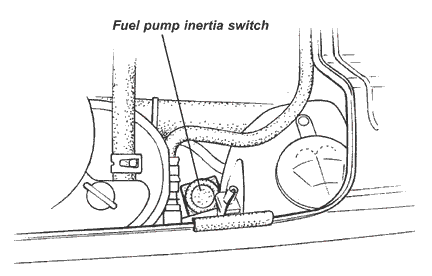
Inertia Switch
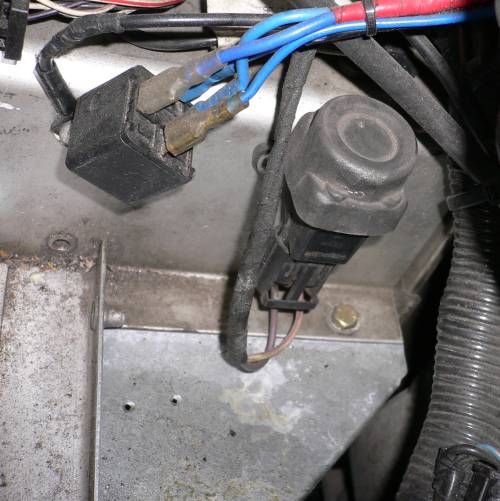 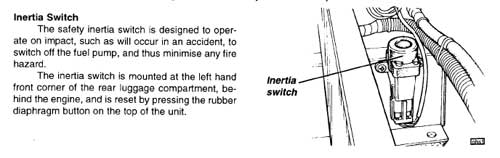
The switch can also be activated by such things as hitting a kerb, or spinning (on track obviously ;) ), so check this switch if your car won't start after such an incident.
For an S1, open the boot, stand on nearside and look straight down, It's about 30cm down, obscured by some pipes etc and is a round (20mm approx) rubber topped push switch. Press to reset.
For an S2, it's located on the left side of the engine bay, near the edge and below and forward of the windshield washer bottle.
Recalls
Please contact your nearest Authorised Lotus Dealer in the first instance or Lotus Cars Customer Services Department on +44 (0)1953 608844 or customerservices@lotuscars.co.uk, stating the full 17-digit chassis number (VIN) beginning SCC to check if your Lotus has any outstanding campaigns against it.
-
Bulletin Ref: 2002/4R 16/09/2002 Elise 2001 M.Y. Rear suspension toe-link check VOSA Ref: R2002/124
A small number of Lotus Elise models ... have been identified as having been built using a rear suspension component which may not meet the specified quality standard. In the unlikely event of failure of this part, unstable handling would result. Cars within the affected range are to be visually inspected by the dealer, and when necessary, replacement suspension links fitted.
-
Bulletin Ref: 2001/2R 02/02/2001 Elise/Exige Mk1 Replacement of fuel filler breather hose VOSA Ref: R2001/014
There is a problem with the breather hose on the fuel filler. Some Elises and Exiges have been identified as having been fitted with a filler breather hose of an incorrect material, with a reduced durability and an increased potential for leaking. A leaking filler breather hose will allow fuel spillage when refuelling or when cornering. This is not a problem that requires immediate attention and the part will be replaced by your dealer free of charge. It takes about an hour to replace the part.
-
Bulletin Ref: 2000/1R 06/03/2000 Elise Mk 1 111S Fitment of ECM electromagnetic shield VOSA Ref: R2000/032
Bulletin Ref: 2001/1R 02/02/2001 Elise Mk1 111S Fitment of misfire protection device VOSA Ref: R2000/146
Lotus has recalled 1,300 Elise 111S models. In some circumstances electromagnetic interference could cause an engine misfire, with consequent loss of power and an increase in exhaust emissions and can
leading to exhaust catalyst damage. This recall involved the fitment of a metal plate placed behind the Engine Management Computer. Only 111S variants were affected, and owners can call 0800 0365688 for more details, or see here for some more details
-
Bulletin Ref: 1998/2R 17/06/1998 Elise/Exige Mk 1 Respecification of rear toe-link fixings VOSA Ref: R1998/050
A recall was made on the rear suspension toe link bolt which may become loose and cause 'unstable handling'. 3771 vehicles were affected, chassis numbers T0001 to W3800 (built June 1996 to June 1997). The fix was to fit a new, longer bolt and apply locking compound
Soft Top Roof - Fitting & Removal
Fitting
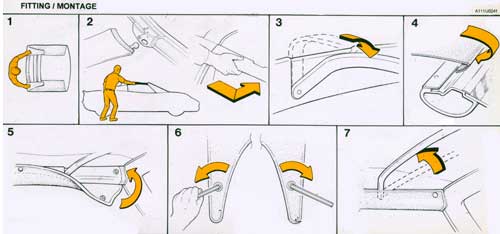
Check rear window and roll bar cover are fitted first!
- Retrieve side cant rails, roof rails, and unroll roof.
- Plug spigot of front side rail into the socket at the top of the windscreen pillar, align tapered guide at rear of side rail with wedge on the roll over bar. Push rail in to lock against the spring clip. Repeat for opposite side.
- Fit roof bows into the locating holes in the roof side rails (bend to fit). Fold forward.
- Hook the length of the front lip of the roof beneath the retaining strip on the windscreen header rail. Centralise roof by locating the pip on the front roof lip with a notch in the header rail.
- Wrap side flaps around the side cant rails, clip in the 3 press stud fasteners on the inside of the rails.
- Unfold roof tails and engage the pin in each tail with its keyhole slot in the body buttress. Ensure pin is engaged before using the hex key provided (stowed in the corner panel behind the right hand seat) to turn each cam pin to tension the roof.
Turn the right hand pin clockwise, and the left hand pin counterclockwise.
- Push the two roof bars rearwards (upright) to fully tension the roof.
Removal

- Push both roof bows forward to release tension on the roof
- Use the hex key (as above) to release the tensioning pins in the roof tails (turn in the opposite direction described above). Pull each tail backwards to disengage the pin from its keyhole slot; fold the tail over and tuck the end under the elastic strap to protect the paintwork and glass from the pin mechanism
- Unclip the 3 press studs securing the roof to the inside of each side rail.
- Pull the front edge of the roof forwards to disengage from the header rail slot. It helps to start at the corners and use your hand inside the car and under the fabric to ease the roof forward and out of the rail slot.
- Lift the roof off and lay upside down. Fold over the side sections towards the centre.
- The roof rails fit under the rollbar, behind the seats, as shown; or in a channel in the boot, secured by a velcro tab.
- Remove roof and side rails by releasing the rear spring clip first and lifting out of the front windscreen joint.
- Roll up the roof from the tail ends and fit in storage bag.
Cobra Alarm - Reset & Reprogram Procedures
The key fob and car are preprogrammed with a set of matching codes, but after removing the battery or changing to a spare fob, they get out of sequence - so you have to roll the fob over its numbers until they match. This is done as a security measure to stop people with 'scanners' picking up and using your locking code. To resynchronise - stand next to the vehicle and press both the large and small buttons on the key ring together for around 10 seconds until the LED flickering stops, then release both, and press the larger button twice.
You can reprogram your Cobra (or set up a new one - ebay "cobra 777 key fob") if you have the PIN code as follows:
-
STEP 1 – PREPARING ALL REMOTE KEY FOBS - ALL FOBS MUST BE DONE SIMULTANEOUSLY
- Press and hold both buttons on the remote until the LED stops flashing (about 10 seconds).
- Repeat for all remotes to be programmed.
- The LED on the remote should stay ON
-
STEP 2 – ENTER PIN
- Turn the ignition ON and OFF 3 times within 5 seconds (no need to start the engine, just turn the key enough for the dash lights to come on)
- The security LED on the dash will blink once, indicating that the security code can now be entered.
- Enter security code as follows:
- Turn ignition ON & count the number of LED flashes to represent the1ST digit of code, then turn the ignition OFF.
- Repeat for 2nd digit.
- Repeat for 3rd digit.
- Repeat for 4th digit.
- If you miss count the flashes, just wait ten seconds and start again - you won't ever block your alarm no matter how many times you give this a go.
- Turn ignition ON (the LED on the dash should now be off, touch the override key in its socket (if you have one)) and LED will come on permanently if the correct code has been entered
- STEP 3 – COMPLETE THE REMOTE KEY FOB PROCEDURE
- Press and hold the large button on one of the remotes until the security LED light in the dash goes out then comes back on.
- Do this for each remaining remote
- Turn off the ignition and check each remote for the correct operation.
Disclaimer : All information is supplied as a guide only.
No Guarantee as to its reliability can be issued.
You use this information entirely at your own risk.
No Reproduction or Reuse without prior written consent.
© Elise FAQ Team 2002 |